In fact, various dinosaur parks and exhibitions are filled with various animatronic dinosaur and animal models. After all, these two mainstream decorative models are the most sold. However, as a manufacturer with ideals and vision, we still have to expand into more challenging products, such as monsters in Greek mythology that are favored by European and American customers.
The status of the beast “Chimera” in Greek mythology among people in Europe and the United States is similar to that of Taotie or Pixiu in the hearts of the Chinese, so there is a big market for restoring the beast models. Therefore, we will show here in detail how an animatronic Chimera model is made.
Information Board:
#Step One: Making mechanical steel structures
#Step Two: The frame wrapped with high-density sponge
#Step Three: Shaping sponge into the contours of the beast (Chimera)
#Step Four: Ironing the skin texture on the sponge that has been shaped into the beast form
#Step Five: Apply silicone evenly to create the skin
#Step Six: Airbrushed beast skin color
#Step Seven: Test animatronics running / dynamics
Step One: Making mechanical steel structures

Animatronic Beast Mechanical Frame – Chimera Style
First, our workers have to weld the steel frame structure of the monster, and then the electricians will install the motor at each mechanical movement point and test its dynamic conditions. If there are no abnormalities in the test results, the entire mechanical structure will be treated with rust prevention.
NOTIFICATION: The steel we use is galvanized steel, which has anti-corrosion properties, and can be used for a longer time after anti-rust treatment.
Step Two: The frame wrapped with high-density sponge

Use Sponge to Wrap Beast Mechanical Frame – Chimera Style
Wrap the entire mechanical steel frame with a layer of standard-50 density sponge. During the construction process, experienced workers are needed to hollow out the sponge according to the dynamic position of the machinery and stick them accurately on the steel frame one by one, so as not to affect the subsequent operation of the machinery.
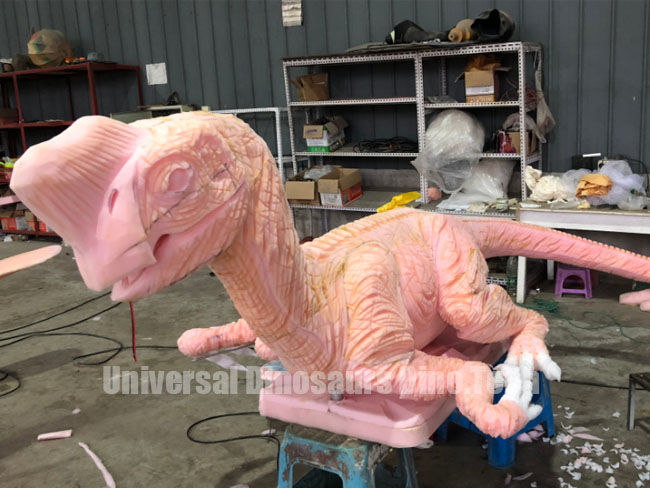
Step Three: Shaping sponge into the contours of the beast (Chimera)
After wrapping the high-density sponge, our experienced sculptors will begin to shape the outline of the beast (Chimera) on the sponge. Our workers use knives to carve the beast’s head, body, tail, muscles, eyebrows, etc. through handcraft.
The carving technique is a test of the craftsmanship of the carver, and only a carver with at least 2-3 years of experience can complete such a job.
Step Four: Ironing the skin texture on the sponge that has been shaped into the beast form

Textures Creating on The Chimera Sponge
After completing the carving of the beast’s form, our workers will then use a soldering iron to create the beast’s skin texture like painting.
Usually make 2 types of skin textures:
- Bark-like cracked skin texture
- Skin texture that resembles dots of different sizes
Bark-like cracked skin texture

Textures Creating on The Sponge
Step Five: Apply silicone evenly to create the skin

Silicone Skin Creating on The Chimera Model
After the beast’s skin texture is completed, our workers will use silicone mixed with gasoline to evenly apply it layer by layer on the beast’s sponge body. Usually three coats are required to meet the requirements.
After applying the silicone, you have to use stockings to stick it on your body and then apply a layer of gasoline! In this way, when the silicone and gasoline dry up, the beast skin with strong elasticity and toughness is completed.
Step Six: Airbrushed beast skin color

Finished Color Works for Beast Model / Chimera Style
Once the beast’s silicone skin has dried, our skilled dyers will spray-paint the beast’s lifelike skin color. Usually, the beast is dyed bit by bit using a combination of oil paint + silicone + gasoline.
Our dyeing workers have to mix the skin color pigments one area at a time according to the color of the original picture, and then dye the body bit by bit using a spray gun. Usually, the color of an area needs to be applied with 2-3 layers of spray gun works, which is a special test of the dyeing worker’s technical level.
Step Seven: Test animatronics running / dynamics
Once the skin dyeing process is completed, after about 1-2 hours of waiting, our electrical engineers will test the internal mechanical operation.
Generally, it will be powered on, and the workers will observe for 10-15 minutes to listen to whether there are any abnormal sounds when the internal machinery is running! It will then run continuously for 3-5 hours to ensure that the beast robot has no mechanical problems before it is considered to have completed the work.
Summarize
The above 7 steps are the process of building a Greek mythological animatronics beast! The work is rigorous and the product quality is guaranteed. Our animatronics models can meet all the requirements of customers, please contact us to build your beast world.